Master Hip Hinge Training Protects Spine
The Movement Pattern That Keeps Your Back Healthy for Life
Think about the last time your lower back ached after a day of yard work, or how you braced yourself before picking up something heavy off the floor. That hesitation, that tightness, it is not just age. Most of the time, it comes down to a movement pattern that nobody ever taught you. The hip hinge movement pattern is one of the most important mechanics your body can master, and without it, your spine absorbs forces it was never designed to handle. Every bend, every lift, every time you reach toward the floor, you are either protecting your spine or quietly wearing it down.
Lower back pain affects roughly 80% of adults at some point in their lives. In my experience working with clients here in Carmel, Indiana, the majority of those cases share a common thread: people move their spine when they should be moving their hips. The hip hinge is the correction to that pattern, and once it clicks, everything changes.
What the Hip Hinge Actually Is
The hip hinge is not an exercise. It is a fundamental human movement where the hips fold and unfold as the primary source of motion while the spine stays long, stable, and in its natural position. Your hip joints are ball-and-socket joints built for exactly this kind of load. Your lumbar discs are not.
When you pick up a bag of dog food by rounding your lower back, the front of your spinal discs gets compressed while the back portion gets pulled apart. Do that a few hundred times a week and you are creating the conditions for disc bulges, facet joint irritation, and chronic pain. When you hinge at the hips instead, those forces shift to your glutes, hamstrings, and posterior chain: muscles that are large, strong, and evolved to do exactly this work.
Research published in the Journal of Biomechanics found that proper hip hinge mechanics reduce compressive forces on lumbar discs by up to 60% compared to spine-dominant bending patterns. That is not a small difference. That is the difference between a back that holds up for decades and one that starts breaking down in your 40s.
Why Most People Hinge Wrong
The problem is not effort. Most people are genuinely trying to move well. The problem is body awareness. When you bend your back to pick something up, it feels natural because you have done it thousands of times. Your nervous system has grooved that pattern deeply, and breaking it requires deliberate practice, not just good intentions.
There are a few common errors I see consistently:
Initiating with the spine instead of the hips. This is the most common mistake. The movement starts at the lower back instead of the hip crease. Often it comes from tight hamstrings that restrict how far the hips can fold before the pelvis tilts and the lumbar spine takes over.
Letting the knees drift forward. When the knees bend too much during a hinge, the movement becomes a squat. Squats are excellent, but they train different things. A hinge keeps the shins relatively vertical and drives the hips backward, not downward.
Losing the head and neck position. Your head weighs about 10 to 12 pounds. Where it goes, the rest of your spine tends to follow. People often jut their chin forward as they hinge, which breaks the chain of neutral alignment from the base of the skull all the way to the tailbone.
Shifting weight onto the toes. This moves your center of mass forward, which transfers load from your posterior chain to your lower back. Weight should stay primarily through the heels and midfoot throughout the movement.
A good personal trainer can identify which of these patterns is driving the problem for you specifically. Most people cannot feel their own errors because the faulty pattern is what feels normal to them. External eyes and targeted feedback change that quickly.
Building the Pattern: Where to Start
Learning the hip hinge does not require a gym membership or equipment. It requires attention and repetition.
The wall drill is where most of my clients begin. Stand about 12 inches from a wall with soft knees. Push your hips backward until your glutes lightly touch the wall, then stand back up. That backward reach of the hips, without the spine rounding forward, is the core sensation you are looking for. Once you feel it, practice it. Ten to fifteen repetitions at the start of your day takes under two minutes.
The dowel drill adds a feedback layer. Hold a broom handle or dowel along your spine with contact at the back of your head, between your shoulder blades, and at your sacrum. Hinge forward. All three points must maintain contact throughout the movement. If the dowel leaves your lower back, your lumbar spine has started to flex. This drill teaches you exactly what neutral means from the inside.
Most people need two to four weeks of consistent practice with these unloaded drills before the pattern becomes reliable enough to add weight.
Try This: The 90-Second Wall Hinge Check
Before your next workout or morning routine, stand facing away from a wall with your heels about 10 inches from the baseboard. Push your hips back toward the wall without bending your knees more than slightly. Your hips should reach the wall while your chest stays lifted and your lower back stays long. If your spine rounds before your hips reach the wall, your hamstrings need more mobility work before you load this movement. Spend 60 to 90 seconds in that end range, breathing through it, before returning to standing. Repeat three to five times. Simple, and genuinely useful as a daily reset.
Loading the Hinge: Romanian Deadlifts and Kettlebell Swings
Once the pattern is reliable, adding external resistance accelerates the benefits significantly.
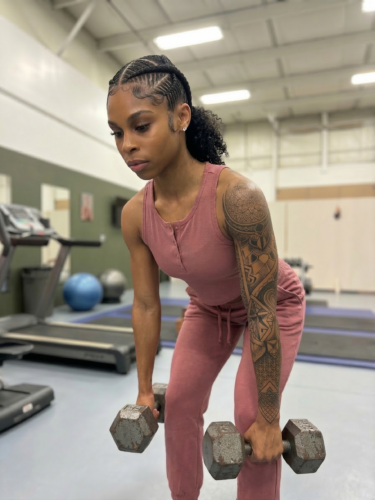
The Romanian deadlift is the classic loaded hip hinge. You hold a barbell or a pair of dumbbells, hinge at the hips while maintaining a neutral spine, lower the weight until you feel a stretch through your hamstrings, and then drive your hips forward to return to standing. The tempo matters. Lowering slowly, around three seconds down, builds the eccentric strength that protects your hamstrings and teaches control. Sets of 6 to 10 repetitions with a weight that challenges you without compromising form will develop real posterior chain strength over time.
Kettlebell swings add a ballistic element that bridges the gap between slow controlled strength and the explosive hip extension demands of everyday life, whether that means getting up quickly from a low seat, playing with grandchildren, or pushing off hard on the tennis court. The swing is a dynamic hip hinge. The bell moves because the hips move fast, not because the arms pull. Done correctly, it builds power, endurance, and reinforces the same hip-dominant mechanics you have been practicing in slower contexts.
A client of mine, a 58-year-old who had dealt with recurring lower back tightness for years, was skeptical when we started working on his hip hinge mechanics. He had been told by a previous trainer to “just avoid bending.” Six weeks into practicing Romanian deadlifts and wall drills consistently, he told me he had loaded the dishwasher three times in a row without thinking about his back at all. That is the real outcome we are after.
Hip Hinge in Real Life
The point of all this training is not the gym. It is every movement outside of it.
When you reach into the back seat of your car, that is a hip hinge opportunity. When you pick up a laundry basket from the floor, plant your feet, push your hips back, keep your spine long, and let your legs do the work. When you are raking leaves or gardening or sweeping, pause for a moment and check whether your lower back is curling forward or whether your hips are doing their job.
These are not complicated techniques. They are just different habits, and habits change through repetition. The goal is for the hip hinge to become your automatic default whenever your body moves into a forward-leaning position.
A dear friend who trains with me started using hip hinge mechanics while gardening after we worked on it for a few weeks in sessions. She told me she used to be done after 45 minutes because of back fatigue. Now she works two hours and feels it in her legs instead. That is the shift we are looking for.
What Hip Mobility Has to Do With It
You cannot hinge properly without adequate hip mobility. Your hips need roughly 90 to 100 degrees of flexion to complete a full hinge while keeping the spine neutral. When that range is restricted, which it often is in people who sit for long hours, the lumbar spine compensates by flexing to make up the difference. This is why stretching alone is rarely enough.
The 90-90 stretch is one of the most direct mobility tools for this purpose. Sit on the floor with one leg in front bent at 90 degrees and one leg behind bent at 90 degrees. Lean your torso forward over the front leg while keeping your spine long. This position addresses both hip internal and external rotation, and most people feel meaningful improvement in hip hinge depth within two to three weeks of consistent daily practice.
Hip flexor tightness also disrupts hinge mechanics by creating an anterior tilt in the pelvis. The half-kneeling hip flexor stretch, performed for 60 to 90 seconds on each side, helps restore neutral pelvic positioning and gives your hips the range they need to move properly.
Core Stability Completes the Picture
Strength through the posterior chain is one half of the equation. The other half is the stiffness that holds your spine in position while that strength is being expressed.
Before you begin any loaded hip hinge, create intra-abdominal pressure by taking a breath and bracing your entire midsection as if preparing for contact. This pressure acts as internal hydraulic support for your spine. Research shows that effective core bracing during lifting tasks reduces spinal compression forces by approximately 40%. That is meaningful protection, and it costs nothing except the habit of doing it consistently.
For heavy sets, the Valsalva maneuver (breathing in, holding, bracing, then lifting) provides maximum stability. For lighter work and higher repetitions, exhaling during the exertion phase while maintaining tension works well and is easier to sustain over longer sets.
Where a Personal Trainer Fits In
Here is what I have learned over 20 years of coaching: most people can read about the hip hinge, watch videos, and understand it intellectually, and still move incorrectly. Not because they are careless, but because faulty patterns feel normal from the inside. What looks like spine flexion in a mirror often feels like a straight back to the person doing it.
A personal trainer watches from multiple angles, uses verbal cues matched to your specific errors, and adjusts the feedback until something clicks for you. They also determine when you are ready to progress and when you need more time at a particular stage, which is a judgment call that self-directed training often gets wrong in both directions.
If you are based in Carmel, Indiana and want to get serious about moving better and protecting your back for the long term, I would love to have a conversation. At Mobility360.fit, this is exactly the kind of work we do every day with professionals who want their bodies to last.
The hip hinge will not make your back problems disappear overnight. But practiced consistently and progressed intelligently, it will change how you move through every part of your life. That is worth the investment.